How to Index Gears on a Bike: Step-by-Step Gear Adjustment for Beginners
Gavin Richardson - July 20 2023
Welcome, fellow bikeaholics! Today, we embark on a quest to unravel the mysteries of gear indexing and tame those unruly chains! Get ready to don your mechanic hat and unleash your inner bike whisperer.
If you're an avid cyclist or a casual rider, you know how crucial it is to have a well-functioning gear system on your bike. Properly indexed gears can make your ride smoother, help you tackle those techy terrains effortlessly and power down on those straights.
However, a misaligned or poorly indexed gear system can lead to frustrating gearshifts, chain slippage (No one likes a pedal to the shins), and even potential damage to your drivetrain.
In this comprehensive guide, we'll walk you through the step-by-step process of indexing gears on your bike to achieve optimal shifting and a more enjoyable riding experience.
Understanding Bike Gears and Indexing
Before diving into the process of indexing gears, it's essential to understand the basics of how bike gears work.
Most bicycles come equipped with a derailleur system, which is responsible for moving the chain between different gears.
A gear cable runs from your shifter to the derailleur, this pulls the derailleur up the cassette bringing the chain up with it. When shifting down gears, tension on the cable is released and the spring on the derailleur pulls the chain back down the cassette.
Indexing gears involves aligning the derailleur(s) to ensure the chain moves smoothly and precisely between gears without any hesitation.

Tools You'll Need
Before you start, make sure you have the necessary tools for the job. Here's a list of items you may need:
- A bike stand (optional but recommended)
- A set of hex keys (commonly 2mm, 3mm, 4mm, 5mm)
- Screwdrivers (flat and Phillips head)
- Chain lubricant
- A clean, lint-free rag
- A cable puller or needle-nose pliers
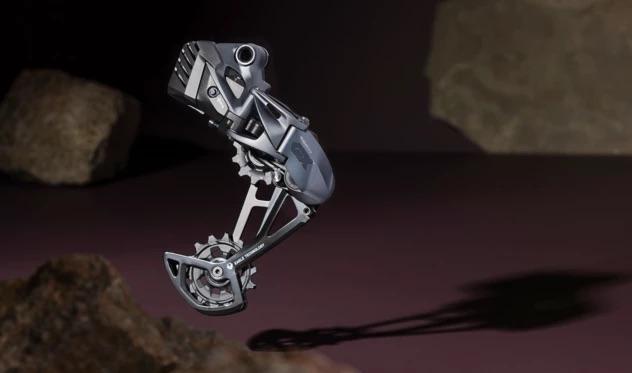
Understanding the Parts of a Rear Derailleur
To effectively index your bike's gears, it's essential to familiarize yourself with the main components of a rear derailleur. Understanding how these parts work together will give you a better grasp of the indexing process.

- Cage: The cage is the part of the rear derailleur that holds the two jockey wheels and guides the chain across the rear cogs. It is designed to move back and forth, guiding the chain from one cog to another.
- Jockey Wheels:
The jockey wheels, also known as pulley wheels, are small wheels with teeth that sit in the cage. They help maintain tension in the chain and assist in smooth movement during gearshifts. There are two wheels known as;
Upper Jockey Wheel: The upper jockey wheel is the smaller of the two and is positioned closer to the gears. It plays a crucial role in guiding the chain during shifts up and down the cassette.
Lower Jockey Wheel: The lower jockey wheel is the larger of the two and sits farther away from the gears. This wheel keeps tension on the chain during shifting. - High and Low Limit Screws: The high and low limit screws are small screws located on the rear derailleur body. They serve as adjustable stops, limiting the movement range of the derailleur. Properly setting these screws ensures that the chain doesn't overshoot or fall short of the outermost cogs. Once this is set up properly it shouldn’t need to be touched again unless knocked.
- Cage Tension or B-Tension Screw: This screw adjusts the distance between the upper jockey wheel and the cassette. Proper adjustment of this screw is crucial to ensure that the chain shifts up and down the cassette smoothly.
- Derailleur Hanger: The derailleur hanger is a part of the bike frame where the rear derailleur attaches. It is designed to be a sacrificial component, designed to bend or break in the event of a crash, protecting the more expensive derailleur from damage.
- Cable Tension Adjuster (Barrel Adjuster): The cable tension adjuster, also known as the barrel adjuster, is a rotating mechanism on the rear derailleur or the shifter. It allows for fine-tuning the cable tension without needing to use tools.


Understanding these components will not only help you during the indexing process but also enable you to troubleshoot any issues that might arise with your rear derailleur.
Now that you have a solid grasp of the parts of a rear derailleur, its time to take a look at the step-by-step guide on how to index gears on your bike.
Step 1: Preparing Your Bike
Properly preparing your bike for the indexing process is essential to ensure accurate adjustments. Follow these steps:
- Clean Your Drivetrain:
We start with a ritual cleanse of your trusty steed! Use a gentle degreaser to remove dirt and grime from the chain, gears, and derailleur(s). A clean bike will allow you to make precise adjustments without interference from dirt or debris.
Take a read of our "How to Clean Your Drivetrain" blog for helpful cleaning techniques.
- Check Chain and Cables: Inspect your bike's chain and cables for any signs of wear, rust, or fraying. If you notice any issues, replace them before proceeding with the indexing process. A chain checking tool is a great thing to own and will help in diagnosing when your chain needs replacing.
- Get Your Bike in the Air: If you have a bike repair stand, lift your bike onto it. This will elevate the bike to a comfortable working height, making it easier to access the gears and derailleurs. If you don't have a stand, you can flip the bike over, but be careful not to damage the shifters and brake levers.

Checking your chain for wear routinely is highly advised. Changing your chain prematurely can help prevent drivetrain wear. Saving you money.
Step 2: Adjusting the Rear Derailleur
The rear derailleur is responsible for moving the chain across the rear cogs. Proper adjustment is crucial for smooth shifting.
- Set the High and Low Limits:
Limit screws will generally only need to be adjusted when setting up a new derailleur. (Tip: if your limit screws are incorrect, yet it is not a new set up, you may want to check your derailleur hanger is straight)
Locate the high and low limit screws on the rear derailleur. These screws control the movement range of the derailleur.
It is best to set these screws up without tension in the cable, so make sure to undo the cable from the derailleur.
With the derailleur now sat at the smallest cog (highest gear) at the back. Adjust the high limit screw until the upper jockey wheel is aligned with the smallest cog.
Then, push the derailleur to the largest cog (lowest gear) by hand while pedalling the bike. Adjust the low limit screw until the jockey wheel lines up with the largest cog.
This will ensure the chain doesn’t come over the top of the cassette and into your wheel. - Check Cable Tension: Shift to the smallest cog to release tension on the cable. If your bike has barrel adjusters (these will be found either at the derailleur or at the shifter), turn it clockwise until its closed and then wind back out one turn. Loosen the pinch bolt on the derailleur and pull the cable tight (you don’t need to pull too hard) before re-tightening the bolt.
- Check B-Tension


B-tension is the secret to buttery smooth shifting gears. Please note the correct way to set up for each brand. When setting up on full suspension bikes, B-tension should ALWAYS be set up under sag. You will need to grab a friend to help do this. Sit on the bike and ask them to set the B-tension while you are sat fully weighted on the bike.

Shimano B-tension

SRAM B-tension tool
Shimano 12 speed: When setting up 12 speed Shimano drivetrains there is a line on the back of the derailleur as shown in the first image. Shift into the second to largest gear, line up the edge of the largest gear with the line on the derailleur to get the perfect B-tension.
SRAM 12 speed: When setting up a SRAM 12 speed derailleur you will need the B-tension tool that comes with a SRAM derailleur. Again shift into the second to largest gear, rest the tool against the largest gear and turn the B-tension screw until the little arrow is pointing the centre of the upper jockey wheel.
None 12 speed derailleurs: Generally most non 12 speed derailleurs need setting up in the largest gear. There isnt any tools to help with this so a trusty ruler is your friend. With the derailleur in the largest gear measure the gap between the teeth on the cassette and the teeth on the upper jockey wheel. this gap should be around 5-6mm.
Step 3: Fine-Tuning the Indexing:
Now, we'll fine-tune the indexing to achieve precise shifting.
- Make Sure to be in the Smallest Gear: Ensure you are in the smallest gear at the back and the middle chainring at the front (if you have gears at the front). Use the barrel adjuster or adjust the cable tension to eliminate any noise or rubbing. Tip: If you take tension off and it is still rubbing the limit screw may need adjusting slightly.
- Shift to the Second Gear: Shift to the second gear, if it doesn’t shift up use the barrel adjuster to add tension in small increments until it moves into the second gear.
- Shift up the Gears: Shift into each gear up the cassette, if it doesn’t move up add a small amount of tension via the barrel adjuster until it does.
- Shift Down the Gears: Now shift back down the gears, if it doesn’t drop down into gear remove tension.
- Check the Whole Range:
Check the derailleur moves the chain into every gear smoothly.
Tip: If you can get it to move up but not down, regardless of the right tension. This could be due to a couple of things. Check you derailleur hanger is straight first with an alignment tool (or ask a shop to do it for you) if it still doesn’t fix the issue the spring in the derailleur may have weakened, in which case a new derailleur would be required.
Step 4: Adjusting the Front Derailleur
The front derailleur moves the chain between the front chainrings. Proper adjustment prevents chain drop and facilitates smooth gear changes.
- Set the Height and Angle: Position the front derailleur so that the outer cage is 1-3mm above the teeth of the large chainring. The outer cage should also be parallel to the chainring teeth. Check the angle from the front to ensure it's not tilted too far inward or outward.
- Set the Limit Screws: Locate the high and low limit screws on the front derailleur. Shift to the smallest chainring and adjust the low limit screw until the inward arm of the cage almost touches the chain (While at the top of the cassette). Shift to the largest chainring and adjust the high limit screw until the chain is aligned and doesn't rub against the outboard arm of the cage (While at the bottom of the cassette).
- Check Cable Tension: With the chain on the smallest chainring, pull the cable tight and tighten the pinch bolt to secure it.
- Fine-Tuning the Indexing: Now, we'll fine-tune the front derailleur indexing for smooth shifting. a. Shift to the Middle Chainring:
- Customization and tuning: A professional suspension service allows for customization and tuning according to your riding style and preferences. They can adjust the damping, rebound, and air pressure to optimize your fork's performance too.
Step 5: Fine-Tuning the Indexing:
Now, we'll fine-tune the front derailleur indexing for smooth shifting.
- Shift to the Middle Chainring: Shift to the middle chainring at the front and adjust the cable tension using the barrel adjuster to eliminate rubbing or chain noise.
- Set the Limit Screws: Locate the high and low limit screws on the front derailleur. Shift to the smallest chainring and adjust the low limit screw until the inward arm of the cage almost touches the chain (While at the top of the cassette). Shift to the largest chainring and adjust the high limit screw until the chain is aligned and doesn't rub against the outboard arm of the cage (While at the bottom of the cassette).
Step 6: Lubricate the Chain
After indexing the gears, it's essential to lubricate the chain. Apply a suitable chain lubricant and let it sit for a few minutes. Then, use a clean rag to wipe off any excess lubricant, you want the lube in the chain links not on the outside.
Proper lubrication helps reduce friction and extends the life of your drivetrain components.
Step 7: Congratulations
We didnt even get to ten steps! You've successfully mastered the dark art of indexing gears on your bike, ensuring smooth and precise shifting for an un-clunky riding experience. Regularly check and maintain your gear system to keep it in top shape.
Remember, if you're not confident in performing these adjustments yourself, it's always best to consult a professional bike mechanic.
Now, get out there and enjoy the freedom of the road or the thrill of the trail with your finely tuned gears!
MEET THE AUTHOR
GAVIN RICHARDSON
Some say Gavin invented the wheel. They are lying of course, but he does build a mean set.
Chief of Cykel House, aging rider and father of 3. Gavin has been riding the majority of his life in multiple different forms. He created Cykel House out of passion and enthusiasm for the sport which cannot be matched.
Always on the hunt for the best products and latest trends his finger is right on the pulse.
Interesting fact - Gavin won a handwriting competition at age 7. What a legend.
Likes - A well built berm, beer and raw sprouts
Dislikes - Stainburn woods, headset cable routing and lycra


Comments